Battle of Buna-Gona
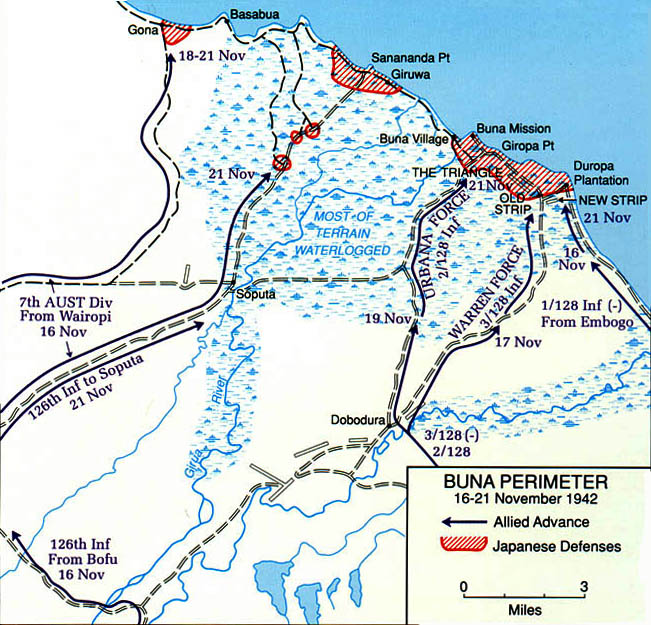
The Battle of Buna-Gona was a battle in the New Guinea campaign, a major part of the Pacific campaign of World War II. On 16 November 1942, Australian and United States forces attacked the main Japanese beachheads in New Guinea, at Buna, Sanananda and Gona. Both forces were riddled by disease and lacking the most basic supplies, including medicine and food.[1] The Japanese were under pressure to hold Guadalcanal, which had forced them to withdraw their forces when they were within sight of Port Moresby. Since arriving in June, the Japanese had built on the north coast hundreds of well-camouflaged, reinforced bunkers in mutually supporting positions blocking all available approaches. Combined with the forces who had returned from the Kokoda Track, the Japanese initially had nearly 5,500 troops on the northern coast. This rose to about 6,500 later in the battle. Because of poor intelligence, Supreme Commander MacArthur and his staff vastly underestimated the number of defenders and the superior quality of the Japanese defensive system. MacArthur's chief of staff Lt. Gen. Richard K. Sutherland glibly referred to the Japanese fortifications as "hasty field entrenchments." When the Allies attacked on three fronts beginning on 16 November, they were immediately stymied by the excellent Japanese defensive position. The Allies suffered heavy casualties and gained virtually no ground. They had only a few artillery pieces and their mortar ammunition was so limited it was rationed. Although requested, the Allies lacked tank and naval support. They received only partially effective air support. MacArthur repeatedly expressed his dissatisfaction with the U.S. 32nd Infantry Division's inability to defeat the Japanese. On 29 November, after 13 days of poor results and high casualties, he ordered Lieutenant General Eichelberger—commander of the U.S. I Corps in the South West Pacific Area—to relieve Major General Edwin F. Harding along with most of his regimental and battalion commanders. Harding was replaced in turn by first, his former artillery commander Albert W. Waldron, then Eichelberger's Chief of Staff Brig. Gen. Clovis E. Byers, and finally by Eichelberger himself. Only then did Eichelberger fully appreciate the difficulty faced by the Allies in overcoming the Japanese forces. He learned that the majority of his troops had fevers and were sick with a variety of illnesses including malaria, dengue fever, bush typhus, and tropical dysentery. Supplies, including food, were a major problem for both the Allied and Japanese forces. The Japanese were at first resupplied by destroyers who slipped through from Rabaul, and later by submarines that arrived by night, until the Allies' increasingly effective air and naval forces cut off further supply. After the battle ended, the Allies found evidence of cannibalism among the Japanese. The Allies were at first supplied only by air drop and by sea until they could build rough airstrips at Wanigela and then Pongani. Even then, they remained short on ammunition, medicine, and food. Some U.S. troops were reduced to a small portion of a C ration each day. The Allied forces only made significant progress when they were finally given the tanks and artillery they had long sought. On 2 January, they captured Buna, and on 22 January 1943, after prolonged intense fighting in extraordinarily difficult conditions, the Allied forces killed or captured almost the entire defending Japanese forces. Only a few hundred escaped to the north. Casualties on both sides were extremely high. General Eichelberger later compared the casualty ratio to the American Civil War. As a percentage of casualties, killed or wounded in action at Buna exceeded the better known Battle of Guadalcanal by a margin of three to one. BackgroundAfter the failure of the Japanese in the Battle of the Coral Sea to take Port Moresby by sea, they had landed on the north coast of New Guinea on 21 July 1942 and established beachheads at Buna, Gona and Sanananda. From there, they had attacked over the Kokoda Track in an attempt to take Port Moresby by land. Meeting the Japanese on the Kokoda Track, the vastly outnumbered Australian forces fought a two-month defensive battle, pushed back over the track toward Port Moresby over very difficult terrain by the superior Japanese forces. Within 48 km (30 mi) of Port Moresby, 80% of the Japanese forces had been wounded, killed or disabled by disease. The Japanese troop's medical care was virtually non-existent, many were out of food, and nearly all of the men were sick.[2]:57 Nonetheless, General Horii wanted to push forward to Port Moresby. His unit paused on a hill just east of Imita Ridge, where his troops could see Port Moresby's lights reflected in the sky, and waited for the reinforcements promised him. When he instead received orders to withdraw so the Imperial Forces could concentrate their resources on the battle for Guadalcanal, he was despondent.[2]:57 The Australian forces counterattacked the retreating Japanese, fighting a series of tough battles against Japanese rearguard defenses on the narrow mountain track. The Japanese established a defensive line at Eora Creek, but after several days of fighting, they left their position to be defended by sick and wounded troops while the remainder escaped to the coast. The Australians continued to attack the withdrawing Japanese until they reached the more heavily defended lines near the Buna-Gona perimeter. Australian forces meanwhile defeated the Japanese's attempt to capture strategically important Milne Bay on the eastern tip of New Guinea. It was the first time in the Pacific war that the Japanese had been prevented from capturing their objective.[2] Impenetrable terrainThe terrain in the Buna-Gona area was principally a swamp. From the foothills of the Owen Stanley Range, the Girua River spread out into a vast tidal swamp and broke into several minor creeks from Sanananda Point to Buna Village. The land at Buna was 5 ft (1.5 m) above sea level. Near the foothills, it rose to only 10 ft (3.0 m). Between two of these creeks, Entrance Creek and Simemi Creek, lay an impenetrable swamp. On the periphery lay dense jungle bush including 6-10 ft (1.8-3.0 m) tall, sharp-edged, kunai grass, thick forest and more swamp. The temperature averaged 95 °F (35 °C) and the humidity 85%.[3] Tangled among the closely spaced 25-100 ft (7.6-30 m) high trees was a tangle of roots, creepers, and brush. If a man stood, which guaranteed he would be shot at, he could only see 5-30 yd (4.6-27 m). Visibility from a fox hole was practically zero. If the ground was not actually swamp, it was thoroughly waterlogged. The only way across was via a few native tracks that followed the higher ground, but even they were always muddy and thoroughly soaked in wet weather. The Japanese had placed their camouflaged bunkers on dry ground at key points across all possible access points. Vehicle travel was impossible.[4] The bush, swamp, forest, rivers and beach made it virtually impossible to flank the Japanese positions. Along the edge of the sea was a strip of dry, sandy soil where the Japanese had built emplacements.[3] Japanese strong defensesThe Japanese were now commanded by Maj. Gen. Oda, succeeding General Horii, who had drowned in the ocean off shore from the Kumusi River[5]:248 while retreating from their initial attack across the Kokoda Track on Port Moresby. Unable to dig deep trenches or shelters due to the .91 m (3.0 ft) deep water table, the Japanese had instead built hundreds of coconut log bunkers.[5]:246 These had been built with mutually supporting lines of fire and were organized in depth. The bunkers were often linked by trenches allowing the Japanese to move at will among them, reinforcing one another.[2] The bunkers were normally supported by infantry in firing pits to the front, sides and rear.[2]:126 Some of the larger bunkers were protected with steel plate or steel rails and 40-gallon barrels filled with sand.[5]:248 Some blockhouses were covered in earth that protected them from artillery fire and concealed with fast-growing jungle vegetation. Some bunkers concealed four or five machine gun emplacements and could hold 20-30 soldiers. A handful of pillboxes near the abandoned airstrip about a mile from the Buna Mission were built using steel and concrete. Many smaller fortifications were placed in perimeter positions that were thick with trees or jungle vegetation. Well-concealed firing slits were a few feet above ground. The bunkers rose only 6-8 ft (1.8-2.4 m) high, and were so well concealed that the emplacements were virtually invisible to attackers until the Japanese unleashed their weapons on the unsuspecting Allied troops. All of these positions could generate devastating interlocking fields of fire, supported by many snipers hidden in tall trees.[6] Japanese forces and supply linesThe Japanese defences were concentrated in three strongholds.[5]:246 One was at Gona, under Major Tsume Yamamoto; another was around Sanananda, under Col. Yosuke Yokoyama (who was in overall command of Imperial Japanese Army forces in the Buna-Gona area); and the third and largest Japanese stronghold was in the Buna area, under Special Naval Landing Forces Capt. Yoshitatsu Yasuda. Although these positions were separate, communications between them and Japanese supply lines were initially strong.[5]:246 At the outset, the Japanese were able to maintain supply lines to Rabaul and to evacuate wounded personnel by sea, using submarines to maintain contact with the beachheads. It took almost two months for the Allies to finally cut the Japanese sea lanes of communication, reinforcement, and re-supply.[5]:262-263 The Japanese garrison was a mix of army and naval forces. It initially numbered about 5,500[5]:248 Imperial Japanese Army combat personnel: the remnants of the 144th Infantry Regiment, the 15th Independent Engineer Regiment, the 3rd Battalion of the 41st Infantry Regiment, a divisional cavalry detachment, and the 47th Field Anti-Aircraft Battalion. A few field artillery batteries were guarding the beachheads proper. In addition to these army units, there were about 500 marines[5]:249 from the 5th Yokosuka and 5th Sasebo Special Naval Landing Forces. Additional troops were landed after the battle began, bringing Japanese strength to about 6,500. Allied intelligence deficientAllied intelligence in the lead-up to the battle was deficient in two key areas. First, "In a major intelligence blunder, Allied staffs told frontline commanders that they faced no more than 1,500 to 2,000 enemy and could expect the Japanese to surrender about 1 December."[7] Other intelligence described the Japanese defenders as "sick and malnourished" when in fact some 6,500 enemy from the Imperial Japanese Army and marines from the Special Naval Landing Forces held the beachhead.[8][9][notes 2] The Allies had very poor maps and limited reconnaissance photos of the area, which would later make it extremely difficult to accurately position and target artillery.[2] Based on what little they knew about the area, Allied intelligence believed that widespread swampland would render the construction of strongpoints in the Buna-Gona area impossible. Supreme Commander Douglas MacArthur received intelligence from Brigadier General Charles A. Willoughby, who told MacArthur before the operation that there was "little indication of an attempt to make a strong stand against the Allied advance."[6] Unfamiliar with the state of Japanese defenses, Lt. Gen. Richard K. Sutherland, MacArthur's chief of staff, glibly referred to these fortifications as "hasty field entrenchments." All of this information led MacArthur to believe that Buna could be taken with relative ease.[6] Allied forces unpreparedAlthough staff officers considered the U.S. 32nd Infantry Division unready for combat, MacArthur felt pressure to produce a victory. In Washington, Fleet Admiral Ernest King—Commander in Chief, United States Fleet and Chief of Naval Operations—was not completely satisfied with MacArthur sharing command with Admiral Chester Nimitz and held out hope that Nimitz might get overall command.[2]:73 MacArthur's repeated requests for naval support were often simply put aside, and MacArthur felt the Admiral's antipathy. MacArthur's position as Supreme Commander was mostly a political and strategic appointment and did not give him any direct combat command.[2]:76 MacArthur did however enjoy a close relationship with Australian Prime Minister John Curtin, who strongly admired MacArthur. MacArthur—who had to depend on Australian commanders to carry out his plans—often used his influence with Curtin to obtain changes in Australian decisions. Australian General Sir Thomas Blamey exercised command of all Allied land forces but he was not well liked.[2] MacArthur insisted that the U.S. 32nd Infantry Division be immediately moved from Australia to New Guinea in October 1942. The 2nd Battalion of the 126th Infantry Regiment was called on to trek 210 km (130 mi) from 14 October-12 November across the extremely rugged Kapa Kapa Trail. They did not encounter a single enemy soldier, but more than ⅔ of their men became casualties, sick with malaria, dengue fever, bush typhus, amoebic dysentery, bacillary, along with jungle rot, dobie itch, trench foot, athlete's foot and ringworm. Exhausted from their march, the division stopped for one week at Natunga to resupply. They then were directed to the front lines against seasoned Japanese combat veterans, and in the ensuring battle soon ran short of weapons, medicine and even food.[10] Inadequate trainingThe beginning of the campaign revealed that the American troops were completely unprepared for jungle warfare. In the U.S., the division had trained for a European war. While standard U.S. Army practices dictated that a division should train together for a year,[11] the 32nd had picked up more than 3,000 replacements fresh out of boot camp when the division was suddenly redirected to Australia.[12] When in Australia, they had moved to three different camps and were tasked with building one of them.[13] What limited training they had received in Australia had been to prepare them to fight in Australia's outback to defend the country from Japanese attack. Their heavy-weight Herringbone Twill combat uniforms were the wrong color. Learning from the experience of Australian soldiers, who in the early part of the Kokoda Track campaign wore tan uniforms that stood out against the jungle, the Americans had two sets of their uniforms dyed a darker green at a dry cleaner in Brisbane.[14] Unfortunately, the dye was more like paint and would not allow the cloth to wick moisture away from the skins, causing skin diseases.[15] The 32nd was not trained, equipped or prepared to fight in the jungle nor taught Japanese tactics. Scant artillery supportThe Allies initially lacked armor, artillery, naval support and air support for their attack.[2]:138 The normal complement of howitzers assigned the 32nd Division included thirty-six 105 mm (4.1 in) howitzers and twelve 155 mm (6.1 in) howitzers. Due to a lack of transportation, these had all been left in Australia. American officers argued against artillery support as unnecessary. General George Kenney—Commander of the Allied air forces in the Southwest Pacific Area—was confident that his planes would supplant the role of traditional artillery. His opinion was respected by MacArthur. Tanks and heavy artillery can be reserved for the battlefields of Europe and Africa. They have no place in jungle warfare. The artillery in this theater flies, the light mortar and machine guns, the rifle, the tommygun, the grenade and knife are the weapons carried by men who fly to war, jump in parachutes, are carried by gliders and who land from air transports on grounds which air engineers have prepared.[2]:139 Major General Edwin F. Harding and his artillery commander—Brig. Gen. Samuel Waldron—finally persuaded MacArthur's headquarters to break down one 105 mm howitzer and fly it to Pongani, where it was moved closer to Buna for fire support. They also borrowed eight 25-pounder guns from the Australians. Allied supply lines distantThe Allies' major bases—at Port Moresby and Milne Bay—were distant. The Owen Stanley Ranges were impassable to motor vehicles. The Imperial Japanese Navy and air forces controlled the Bismarck Sea to the north of New Guinea. The attacking troops initially were dependent on airdrops by the Liberator cargo planes of the U.S. Fifth Air Force and makeshift transport units assembled by the Royal Australian Air Force, as well as coastal shipping, which was vulnerable to air attack. On 2 November, while the 126th Infantry Regiment was crawling on their hands and knees over portions of the Kapa Kapa Track and the 9,000 ft (2,700 m) Owen Stanley Range, a local missionary suggested an alternative. Cecil Abel came into Port Moresby and told the Allies that they might be able to build an airstrip on the far side of the Owen Stanley Range at Fasari in the Musa River valley and at Pongani. Col. Lief Sverdrup set out from Abau on foot with 190 men, including Flight Lieutenant M. J. Leahy, an expert on Papua, who knew many of the tribal chiefs personally. They reached Fasari on 18 October and hired local villages to clear the site by burning the bush and clearing a few stumps. Sverdrup and Leahy explored further north and found another suitable airstrip site near the village of Embessa and Kinjaki, which Sverdrup had cleared. A message dropped by air instructed him to go to Pongani, where he found troops of Company C, 114th Engineer Battalion that had flown to Wanigela airstrip and had made their way to Pongani by traveling along the coast by boat. Sverdrup supervised the construction of Pongani airstrip. All three airstrips were soon in use.[16][17] Sverdrup was later awarded the Distinguished Service Medal for his efforts, including walking across the Owen Stanley Range three times far forward of friendly forces, and building the essential air strips.[18] While the airfields were under construction, supplies were severely limited, and even food was in such short supply during November and early December that many Allied soldiers sometimes received only a small portion of a C ration each day. Mortar crews were given very limited ammo and told to ration it. However, USAAF and RAAF ground attack and bomber aircraft, typified by the Douglas A-20 Havoc and Bristol Beaufighter respectively, represented a significant and ever-increasing advantage for the Allies, although given the jungle overhead combined with poor maps, the Allies dropped bombs on their own units more than once.[2] In October, the Allies captured Goodenough Island to the east of New Guinea without much Japanese resistance and began to use it staging point for air and naval patrols. General Kenney procured a flotilla of local water craft along with a few military ships and ferried supplies from Milne Bay around the southern end of New Guinea to Wanigela, arriving on 16 October.[2]:110 Allied forces launch attackOn 14 October 1942, elements of 2/6th Independent Company were flown from 14-Mile Drome across the mountains to Wanigela Airfield, Wangiela.[notes 3][19]:81 From Wanigela, the company moved to Pongani. When the offensive started, the 2/6th patrolled in front of the U.S. 3rd Battalion, 126th Infantry Regiment along the coast from Pongani to Buna. Under the command of Major Harry Harcourt, they provided flank protection and reconnaissance and was engaged in heavy fighting around the airfield named New Strip until early December 1942.[19]:97-119[20]:360 Situated in the coastal area south of Cape Endaiadere, on a line running inland to Sinemi Creek, this became known as the Warren Force. The U.S. 32nd Infantry Division—commanded by Major General Edwin F. Harding—launched the initial attack on Buna on 16 November. Deployed along the Ango-Buna track, they contacted the enemy about 1 mi (1.6 km) south of Buna. General Harding requested tanks from Milne Bay but the Allies lacked the boats required to ship them. They were later sent thinly armored, open-top, and lightly armed Bren gun carriers, a machine gun or mortar and transport platform.[5]:255 These were rapidly knocked out by the Japanese. Tanks and artillery did not arrive until 18 December, a month after the battle began, when they made a significant impact.[10] Limited artilleryBy 23 November, it was obvious that capturing Gona was unlikely due to a lack of Allied troops and insufficient tank and artillery support. Without support from tanks that could have taken out a strongpoint in minutes, the Japanese positions were very difficult to defeat and had to be taken one by one, which required troops crawling through murderous cross-fire and snipers to the bunkers and pushing grenades through the slits.[21] General Vasey requested that Lieutenant General Edmund Herring send the 21st Brigade as reinforcements. The 32nd Division had only two howitzers belonging to Battery A of the 129th Field Artillery in New Guinea, the remaining batteries having remained at Camp Cable in Australia due to a lack of transport. The four gun sections of Battery A were the first howitzers flown into combat, first landing at Port Moresby. Then, ½ of Battery A—two gun sections—were air-lifted over the Owen Stanley Mountains to Buna and reassembled, becoming the first U.S. Army artillery flown into combat in the Pacific in World War II.[22] When additional artillery finally arrived on 26 November, the accuracy of artillery fire was limited by poor maps and the inability of the forward artillery observer's to see far enough through the dense jungle. On that morning, the Japanese lines were strafed and bombed at tree-top level for nearly an hour by P-40s and Beaufighters. A-20s bombed the Japanese rear areas for another 30 minutes. The air attacks were then followed by 30 minutes of pounding by mortars, machine guns, and the newly available artillery. At 9:30, the infantry advanced as scheduled, but it immediately became apparent that the two hours of bombardment had not touched the enemy, still hidden in their bunkers.[23] Harding reluctantly accepted MacArthur's decision to rely on direct air support, and his troops were stopped cold by the formidable Japanese field fortifications.[24] One battalion of the U.S. 126th Infantry Regiment, detached from the 32nd Division[5]:249 crossed the Girua River at Inonde and joined the Australian 7th Division—minus one brigade—under Maj. Gen. George Vasey. This group, named the Urbana Force, were charged with defending Soputa and with the subsequent attack on Sanananda The Gona push was reinforced by the remnants of Maroubra Force, made up of the battered 30th Brigade, a Militia unit which included the "ragged bloody heroes" of the Kokoda Track, the 39th Battalion.[5]:258 The Australian 16th Brigade—detached from the 6th Division—would push toward Sanananda.[5]:249 The Australian and U.S. forces were shifted between the Buna and Sanananda fronts, resulting in blurred lines of communication and leadership.[2] By the evening of the first day, the Allied lines had barely moved. Units of the U.S. 1/126th Infantry got close enough to the Japanese positions to learn that the Japanese machine guns were positioned in bunkers reinforced with oil drums and covered with roofs.[23] Fighting was bitter from the outset: the Australian 7th Division took 204 casualties in the first three days of its thrust.
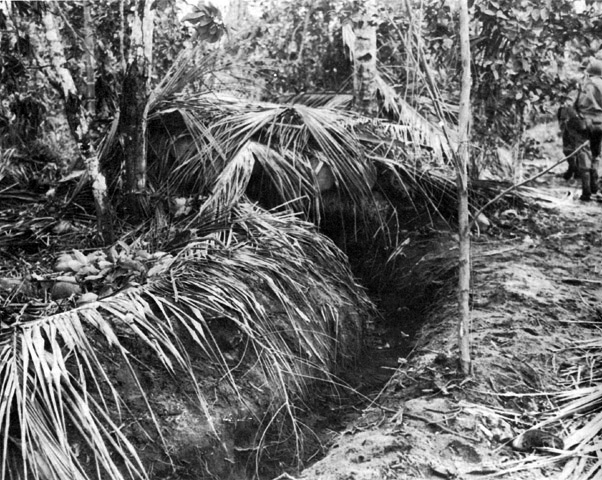
Photo: A firing trench (foreground) leads to a heavily camouflaged Japanese bunker (background) made from coconut logs. Each Japanese bunker contained several well-concealed machine guns. At times, the jungle was so dense that the Allied troops could not tell from which direction the Japanese were firing.[2] Japanese Snipers tied themselves to the tops of coconut trees and picked off targets. By the time the Allied advance on Buna had stalled in late November, morale was low due to heavy casualties and disease. Self-inflicted wounds were increasingly responsible for American casualties.[21][25]
Photo 01: At Giropa Point, Papua, members of the 2/12th Australian Infantry Battalion advance as Stuart tanks of the 2/6th Armoured Regiment shell Japanese pillboxes in the final assault on Buna. An upward-firing machine gun is fitted to the tank, to clear treetops of snipers. (Photographer: George Silk). Advance on Buna VillageOn 20 November, MacArthur—operating from his comfortable headquarters in Port Moresby—ordered Harding to attack "regardless of losses". The following day, he sent another missive to Harding, telling him to "take Buna today at all costs". General Edmund Herring arrived at the American front on 25 November and reported that the American infantry had "maintained a masterly inactivity at Buna". When MacArthur offered the 41st American Division as reinforcements for the advance on Gona, Australian General Thomas Blamey declined. This was later seen as payback for earlier statements by MacArthur about the fighting ability of Australian troops. Blamey stated he would rely on his depleted 21st Brigade as he "knew they would fight".[26] The jokes of the American officers in Australia, making fun of the Australian Army were told all over Australia. Therefore, when we've got the least thing on the American troops fighting in the Buna sector, our high command has gone to General MacArthur and rubbed salt into his wounds.
Photo: General Blamey tours the battle area with General Eichelberger (left) General Berryman to General Eichelberger.[27] On 19 November, Blamey sent a communication through MacArthur and tried to persuade Admiral Arthur S. Carpender—who controlled U.S. Navy vessels—to provide support. The bulk of the land forces in New Guinea have had to move into positions where it is impossible to support them and extremely difficult to give them the necessary ammunition and supplies to maintain them.[2]:138 Carpender would not commit destroyers to the mission and gave the lack of charts for the area as the reason. Even as the U.S. and Australian attack was bogging down, they were offered no naval support. On 29 November, the Japanese were reinforced by the remaining 500 troops from the South Seas Detachment (mostly the 41st Infantry Regiment under Colonel Kiyomi Yazawa), which had led the Kokoda Track campaign and retreated to the sea at a point north of Gona. They were shuttled by boat to the Sananada stronghold. Harding sackedBy 29 November, the Supreme Allied Commander in the South West Pacific, General Douglas MacArthur, had become frustrated at what he saw as poor performance by the 32nd Division, especially its commissioned officers. He told the US I Corps commander, Major General Robert L. Eichelberger: Bob, I'm putting you in command at Buna. Relieve Harding ... I want you to remove all officers who won't fight. Relieve regimental and battalion commanders; if necessary, put sergeants in charge of battalions and corporals in charge of companies—anyone who will fight. Time is of the essence... Bob, I want you to take Buna, or not come back alive ... And that goes for your chief of staff, too.[28][29] On 30 November, the 2/126th became the first to significantly penetrate the enemy lines at Buna, successfully pushing the Japanese back several hundred metres.[30] On 1 December, Harding directed attacks on both the Urbana and the Warren front. On the Urbana front, Company E of the 126th, reinforced by the headquarters companies of both battalions, was able with support from the available 25-pounder artillery piece and mortar support to advance across an open area below the bridge over the Girua River, but then inexplicably withdrew, perhaps due to a communications problem. E and F Companies from the 126th, along with a platoon from the 128th, resumed the attack on 2 December, but were stopped by heavy machine gun fire from every direction they approached. A visiting medical officer reported that the men looked like "Christ of the Cross."[2]:165 These and other reports did not mollify Eichelberger's view of the situation. On the Warren front, the attack on 2 December began with an air attack, but a planned artillery barrage was late. When the infantry finally advanced, they were stopped once again by the Japanese without significant gains. Many troops dropped from heat exhaustion.[2]:166 Eichelberger arrived in Buna to inspect the troops on 2 December after the combat action for the day had played itself out. Accompanied by Harding and Brigadier General Albert W. Waldron, Eichelberger stopped to visit an aid station. They found among the casualties unwounded men who were sick with fever and exhaustion and a few with combat fatigue. Eichelberger was further upset when he learned that day's attack had failed. They walked forward, and when he was not fired on by the Japanese concluded that the U.S. troops faced little opposition. He was disturbed when he found there wasn't a continuous front and criticized the placement of a machine gun, seeing this as proof the men were not pressing a weak enemy. He queried troops about where a path led and was told it was covered by a Japanese machine gun. He offered to decorate any man who would run 50 yd (46 m) down the path. No one took him up on his offer, and he decided they were cowards.[2]:167 Eichelberger vented his anger on Major Mott and Smith, pointing out the unwounded men in the aid station and the machine gunner's hesitance. Mott vehemently exploded, pointed out the suffering and bravery of his men. Harding angrily threw his cigarette on the ground, agreeing with Mott. Eichelberger responded, "You're licked."[2]:167 Two of Eichelberger's staff officers—Col. Clarance Martin and Col. Gordon Rogers—inspected the Warren front. They arrived in midafternoon, after the conclusion of an intense battle which had put all available reserves on the line. Martin could not understand why the men were not pushing forward. They questioned whether there had been any fighting at all.[2]:167 They found the troops were ill with malaria, dengue fever, tropical dysentery, and other ailments. They discovered the men had few rations causing them to lose weight, and lacked hot meals, vitamins, and cigarettes. Some were unshaven, their uniforms and boots were dirty and in tatters, and they showed "little discipline or military courtesy."[28] Without fresh clothing, walking through swamps, and lacking sanitation, many were afflicted with trench foot.[30] Having been on the front at Buna for two weeks with virtually no progress to show for it except for hundreds of casualties, the U.S. troops' morale was very poor.[28] Martin and Rogers arrived back at the 32nd Division headquarters at Dobodura at 22:00 to find that Eichelberger had already relieved Harding. He replaced him with the division's artillery commander, General Waldron. Eichelberger also sacked the regimental commanders and most battalion commanders, ordered improved food and medical supplies, and halted operations on the Buna front for two days, to allow units to reorganize. Eichelberger later noted that after he relieved Harding he "ordered the medicos to take the temperature of an entire company of hollow-eyed men near the front. Every member, I repeat, every member of that company was running a fever."[2]:165 Eichelberger found the men lacked even the oil and patches required to keep their guns free of rust. He put an officer in charge of supply who ignored all protocols to obtain whatever the men needed. Eichelberger conspicuously wore his three stars on his shoulders among the front-line troops, ignoring the rule that officers remove their insignia at the front because they will attract the enemy. He lost thirty pounds in thirty days at the front.[3]:327 Martin later admitted, after some experience with the Japanese defenses, that had attacks been continued on the day he conducted his inspection, they would not have been successful.[2]:167 Allied reconnaissanceEichelberger also ordered additional reconnaissance to help fix the enemy positions. What he learned impressed him. For the Allies, Japanese seemed to be everywhere, but their strongest positions were on the shore-zone terrain. Here troops could move from place to place quickly, and numerous bunkers constructed of coconut logs and sand provided added protection and a superb defensive perimeter. In looking at Japanese positions, MacArthur's staff reported that "every contour of the terrain was exploited and the driest stretches of land were carefully chosen to be occupied and fortified, making it impossible for the Allies to execute any lateral movements without becoming mired in swamp." Lt. Gen. Robert Eichelberger, U.S. Corps Commander, called the Japanese terrain utilization "perfect' and "brilliant."[31]:239 On the same day, 500 Japanese reinforcements, in the form of the inexperienced 21st Independent Mixed Brigade (based on the 170th Infantry Regiment), arrived at Gona under Maj. Gen. Kurihanao Yamagata. The Japanese fought tenaciously and the 32nd Division lost 392 personnel within the first two weeks. Attack reinitiatedOn 5 December, Eichelberger ordered an attack across the entire front. Waldron was shot in the shoulder by a sniper while observing the fighting, and Eichelberger replaced him with his Chief of Staff, Brig. Gen. Clovis E. Byers. The Allies finally split the Japanese lines. Staff Sergeant Herman Bottcher led a 31-man platoon forward against the attacking Japanese forces. He stood up and threw hand grenades at the enemy and was able to drive a wedge between Buna and Buna village. The tide of the battle of Buna turned and Bottcher was awarded the battlefield commission of captain and his first of two Distinguished Service Cross Medals. On 8 December, following savage close-quarter fighting, the Australians captured Gona village.[5]:258 That same day, Eichelberger organized a new attack on Buna Village and the 32nd Division captured the position on 14 December.[33] General Clovis Byers was in turn wounded on 16 December, forcing Eichelberger to take direct command of the division. The Japanese landed 1,300 reinforcements, but by 18 December the Allies were reinforced by the Australian 7th Division's 18th Brigade along with the M3 Stuart light tanks of the 2/6th Armoured Regiment[5]:263—the first tanks available to the Allied forces. In spite of this boost, the Australians suffered some of their worst losses of the entire battle, although they eventually broke through the Japanese defensive positions along the coast. In 10 days of fighting, the Allies advanced along the coast from Duropa plantation to Buna Mission, taking the remaining Japanese positions by 28 December.[5]:270 In the Japanese positions they located the bodies of Allied soldiers who had been captured and found evidence of cannibalism. During the prior attempt to capture Port Moresby over the Kokoda Track, and during their defense of Buna-Gona, the Japanese regularly practiced cannibalism.[notes 4][34]:80. None of the Allied soldiers taken captive during the entire Kokoda Track campaign and the fight for Buna-Gona was allowed to live, and a number of those who were captured had been tortured, eaten, or used for bayonet practice.[1]
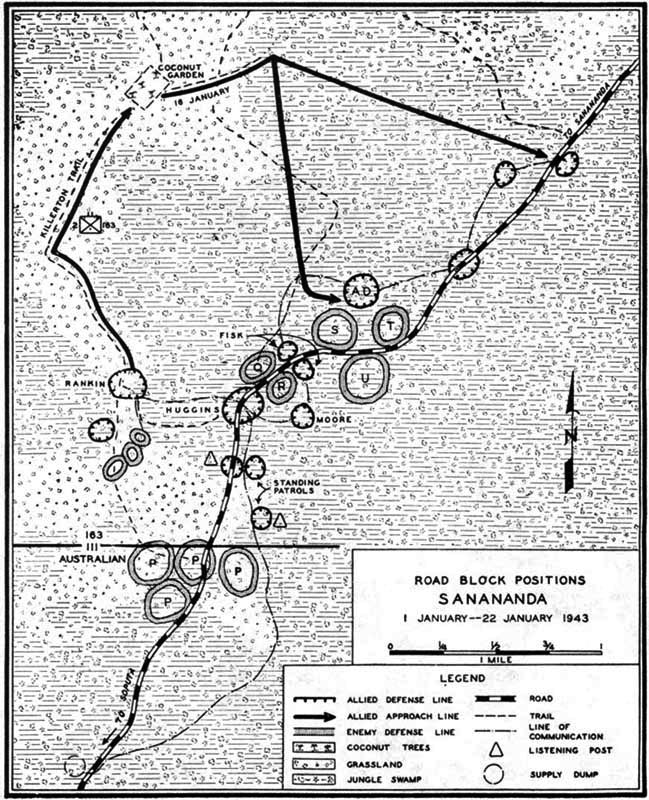
Map 01: Sanananda Front, 22 November 1942-22 January 1943 Battle for SananandaThe battle of Sanananda was the longest of the three battles. The Japanese position was well-defended, astride a raised road on relatively dry ground, surrounded by waist-deep jungle swamp. In an attempt to cut off the forward Japanese positions, the elements of 3rd Battalion, 126th Infantry Regiment flanked the Japanese road block and capture the road behind them. Although they were successful in establishing the roadblock, the Japanese maintained their position, receiving resupply through the swamp. The Australian 16th Brigade—by now half-strength—was sent to attack the position, but their march was poorly organised. From 16 November to their first contact with the enemy on the 19th, the troops went without food. The 1,400 men of 126th Infantry regiment were ordered to report to the Australians but did not arrive until 21 November, by which time the Australians had suffered more than 30% casualties. On 7 December, the Australian 30th Brigade relieved the 16th Brigade, and Brigadier Porter took overall command.[5]:260 The 126th was also relieved but 635 troops manned a roadblock under constant Japanese attack. The remainder of the 2/6th was withdrawn to Soputa and then Port Moresby, where they spent Christmas prior to returning to Australia for re-organization and refurbishment.[19]:110[20]:126 The Americans received their first reinforcements on 18 December when 350 men from the Australian 2/7th Cavalry Regiment fought their way through to the roadblock. The following day, the 2/7th outflanked the Japanese and established another roadblock 300 m (980 ft) ahead of the American position and the Australian 49th Battalion now reinforced the 126th.[5]:260-262 By now, illness and low morale was taking its toll and the 126th were retired on 22 December On 25 December, eight companies of the 127th Infantry followed a large artillery and mortar barrage and attacked the Japanese position in the "Government Gardens" section of Buna. The commanding officer of Company C was killed. Eichelberger later wrote that "the fighting was desperate and the outcome of the whole miserable, tortured campaign was in doubt". Privately, MacArthur constantly pressured Eichelberger to act quickly and obtain results. Eichelberger recorded multiple instances when MacArthur urged him to hasten his efforts to rapidly defeat the Japanese. Having never visited the front, MacArthur sent his Chief of Staff—Richard K. Sutherland—with a letter for Eichelberger which Sutherland delivered on Christmas Day. Where you have a company on your firing line, you should have a battalion; and where you have a battalion, you should have a regiment. And your attacks, instead of being made up of two or three hundred rifles, should be made up by two or three thousand... Your battle casualties to date compared with your total strength are slight so that you have a big margin to work with.[35] Eichelberger wrote back that he was pushing the offensive with the kinds of numbers he felt the situation warranted. He reassured MacArthur that his men were fighting hard. On 28 December, he received a communique from MacArthur that he had released to the press describing the action at Buna Gona. It read, "On Christmas Day, our activities were limited to routine safety precautions. Divine services were held." It left Eichelberger fuming.[3]:328[35] On the night of 25 December, a Japanese submarine unloaded supplies and ammunition at Buna Government Station, the last time the Japanese received supplies.[35] After the campaign's conclusion, MacArthur publicly stated that there was no reason to hurry the Papuan campaign. He said, "The utmost care was taken for the conservation of our forces with the result that probably no campaign in history against a thoroughly prepared and trained Army produced such complete and decisive results with so low an expenditure of life and resources."[3]:328 Of the 635 American troops who engaged the Japanese, only 244 effective troops remained by the end of December.
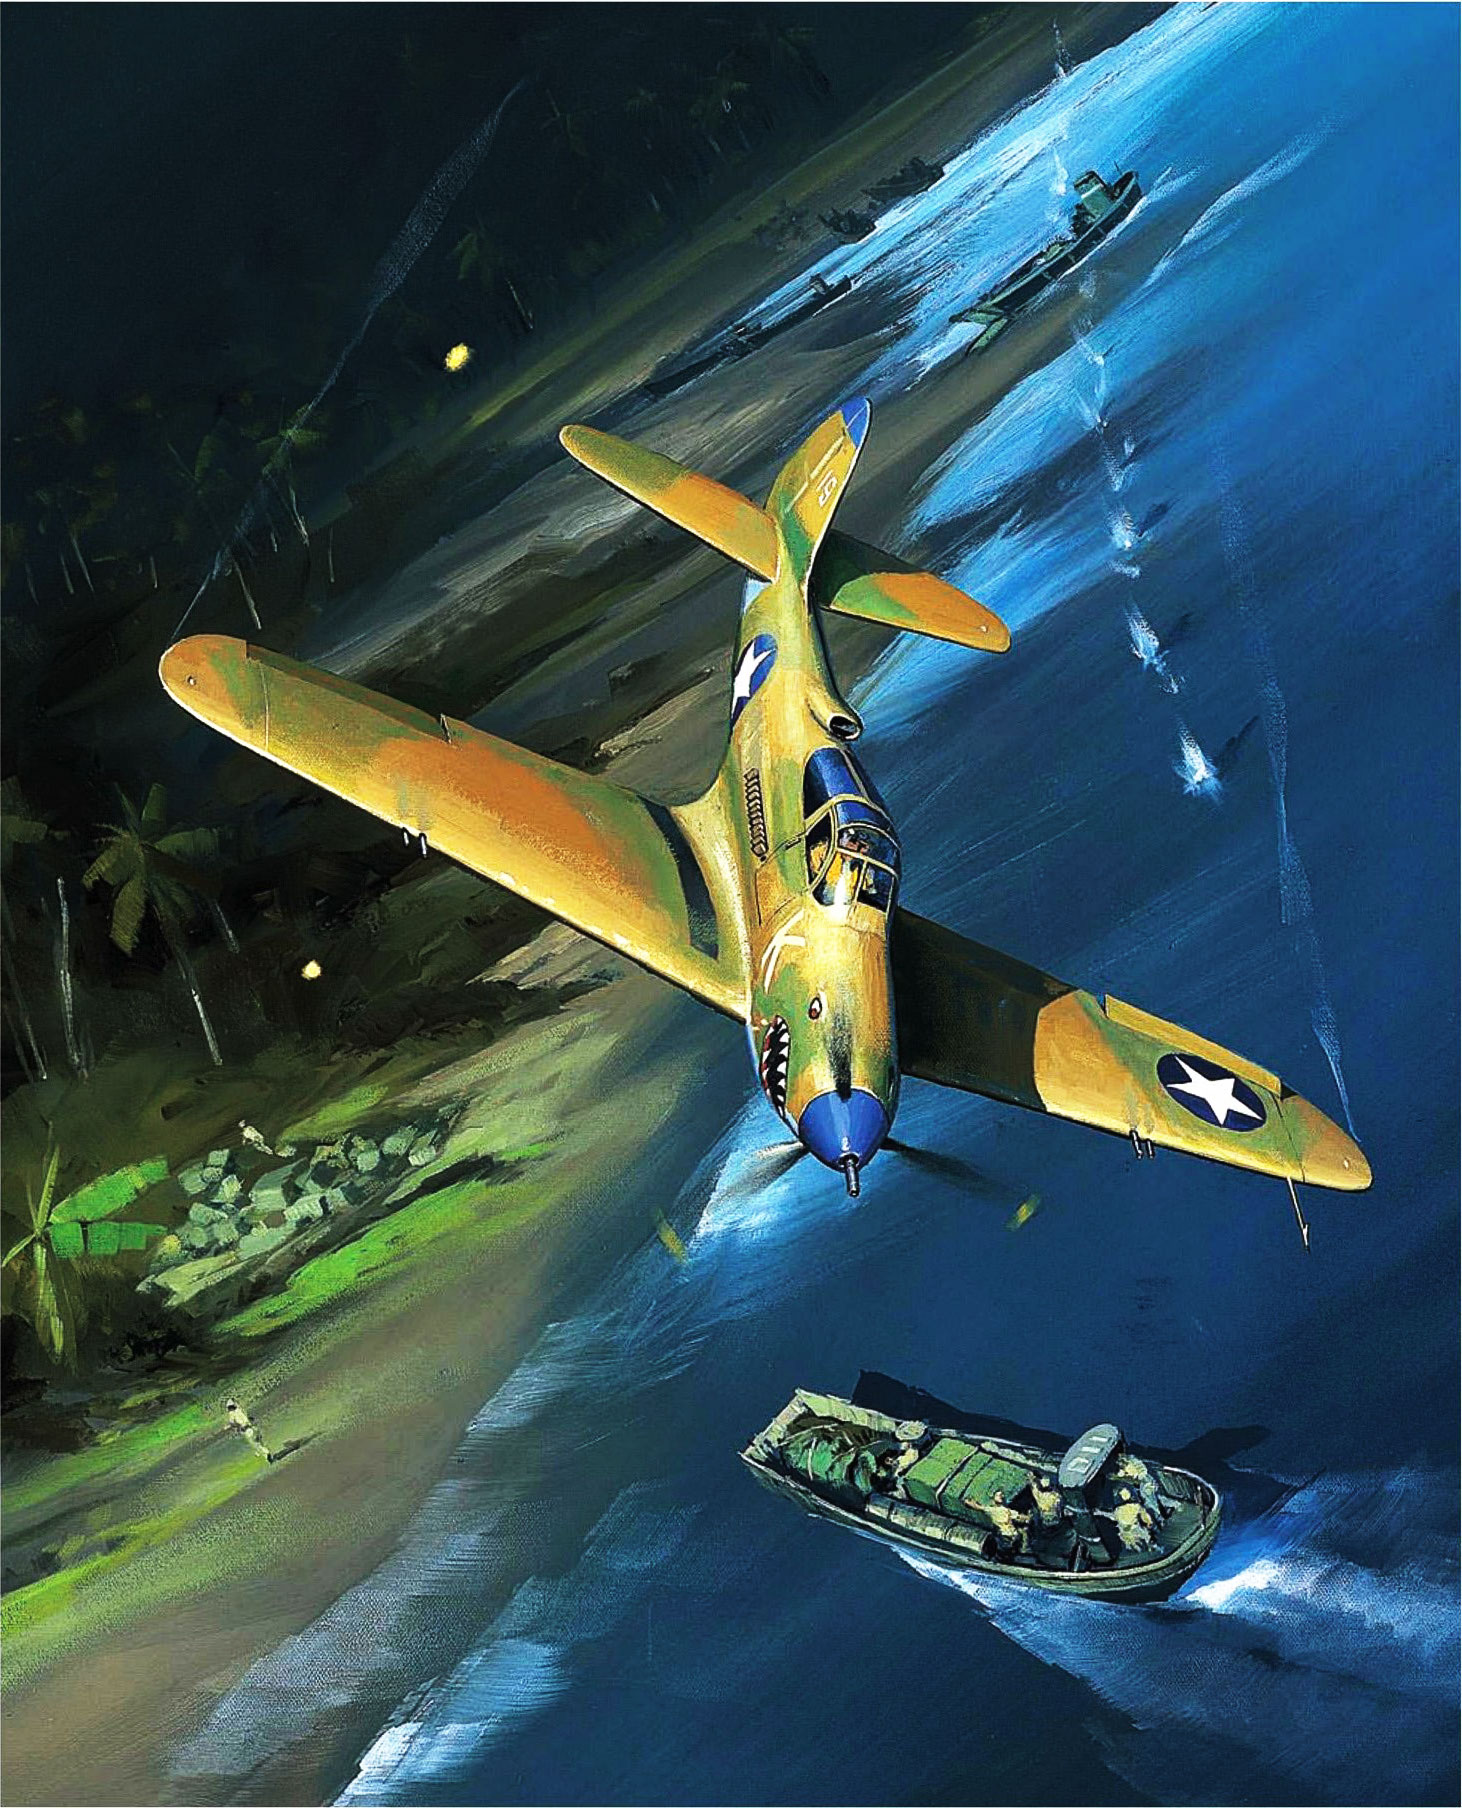
Photo 01: Three American G.I.s dead on Buna Beach [32] Taken by George Strock in February 1943 for LIFE magazine, it was not published until 20 September 1943. President Roosevelt authorized release of this image, the first to depict American soldiers dead on the battlefield. He was concerned that the American public were growing complacent about the cost of the war on human life. 'Stemming the Tide at Sanananda' painted by Jack FellowsBook Reference: 'War in the Pacific Skies' by Charlie and Ann Cooper Zenith Press ISBN-13:978-0-7603-3932-9 On 22nd July 1942 USAAF pilot Norb Ruff flying a P-39 Airacobra from the 18th Fighter Squadron, 8th Fighter Group was among those who attacked IJA resuppy barges near Sanananda Point, Buna, New Guinea. The resupply was part of an intense Japanese effort to take the town of Port Moresby via the Kokoda Trail. Materials on shore indicated that the barges were making a second trip when the Allied pilots arrived, some of whom flew 'Top Cover' as the others attacked at low level. They were fortunate that no opposition from the IJAAF Zero's based in Lae were present giving the fighters a free hand to decimate the slow barges. Allies attack Japanese-held junctionOn 2 January, the U.S. 163rd Infantry Regiment of the 41st Infantry Division—fresh from Australia—arrived and took over the two roadblocks and relieved the Australians.[5]:273 The preliminary attacks began with a failed attack on the Japanese position between the two roadblocks on 8 January.[5]:274 Two days later, the Allies supported by tanks attacked the Japanese position at the trail junction. The attack failed but convinced Col. Tsukamoto to order a retreat. Japanese Imperial Headquarters had already decided on 4 January to retreat to Lae and Salamaua, but the order did not reach Sanananda until 12 January.[5]:276 On 14 January, the Allies discovered that most of the Japanese defenders had left and quickly overran the junction stronghold now held by only 158 Japanese. 15 January saw the U.S. 163rd Infantry finally broke the Japanese position between the road blocks. The main attack began the next day with the 163rd attacking the Japanese troops north of the two roadblocks while the Australian 18th Brigade's attack reached the coast on both sides of Sanananda and also supported the American attack, effecting a link-up at Huggins and on the Killerton Track.[5]:276 Japanese resistance was stiff; nevertheless, by 17 January, they had been pinned down in three positions, on the coast north of Sanananda, on the coast west of Giruwa and on the main track north of the roadblocks which was still holding out. On 20 January, General Yamagata ordered an evacuation and escaped while General Oda and Colonel Yazawa ran into Australian troops and were killed; the Japanese positions on the coast collapsed with little resistance. Evacuation of the main track was not possible and this last position was overrun on 22 January.[5]:276 AftermathAfter almost three months of fighting, the Japanese had lost 1,500 men, the Australians 2,700 and the Americans 798.[5]:276 The Japanese forces had been cut off from resupply during the second week of January and their food had already run out by 2 January. Allied troops found evidence of cannibalism of both Japanese and Allied solidiers in captured Japanese positions.[10][36][37]:343
Photo 01: Papuan stretcher bearers carrying U.S. Army wounded from the Buna front lines, pause to rest themselves and the soldiers in the shade of a coconut grove, en route to hospitals in the rear. Casualty rate exceeds GuadalcanalTropical diseases—especially malaria, dengue fever and bush typhus (known to the Japanese as tsutsugamushi)—caused far more casualties than the effects of battle. The 32nd Division suffered the extraordinary illness rate of 66%. Of the 9,825 men who entered combat in the 32nd Division, 7,125 were casualties due to illness (with 2,952 requiring hospitalisation), compared to 586 killed in action, 1,954 wounded, and 100 more dead from other causes. Total casualties of 9,956 exceeded the Division's entire battle strength.[38] Overall, about 60,000 Americans fought on Guadalcanal, suffering 5,845 casualties, including 1,600 killed in action. On Papua more than 33,000 Americans and Australians fought, and they suffered 8,546 casualties, of whom 3,095 were killed. On Guadalcanal, one in 37 died, while troops in New Guinea had a one in 11 chance of dying.[3]:329 In his book, Our Jungle Road to Tokyo written in 1950, Eichelberger wrote, "Buna was...bought at a substantial price in death, wounds, disease, despair,and human suffering. No one who fought there, however hard he tries, will ever forget it." Fatalities, he concluded, "closely approach, percentage-wise, the heaviest losses in our Civil War battles." He also commented, "I am a reasonably unimaginative man, but Buna is still to me, in retrospect, a nightmare. This long after, I can still remember every day and most of the nights."[3]:327 Historian Stanley Falk agreed. "The Papuan campaign was one of the costliest Allied victories of the Pacific war in terms of casualties per troops committed."[35] The Ghost Mountain Boys of the 2/126th were especially hard hit. When Buna was taken they finished the fight with only six officers and 126 troops standing out of the 900 plus who had started out from Kapa Kapa.[30] The march by the U.S. 2/126th from Kapa Kapa to Jaure and the brutal combat at Buna-Gona taught the Allied armies important lessons that they applied throughout the Pacific Theater and remainder of the war in the Pacific.[39] Recognition and memorialsTwo NCOs from the 32nd Division—both of them killed in action near Buna (1st Sgt Elmer J. Burr and Sgt Kenneth E. Gruennert) —were later awarded the Medal of Honor. Herman Bottcher was awarded the Distinguished Service Cross twice. Allied operations against Japanese forces in New Guinea, including Operation Cartwheel and the Salamaua-Lae campaign, continued through 1945. A brass memoral plaque on a pole was mounted in a concrete base on the site of the Huggins roadblock after the war. Capt. Meredith H. Huggins, USA. 3rd Battalion, 126th Infantry Regiment, 32nd Division "Huggins Road Block" November 1941 - December 1942 After his commanding officer was killed, Capt. Huggins assumed command of companies of the 126th Infantry, 32nd Division. Tasked with securing a critical choke point to thwart a rapid Japanese advance across the Kokoda Trail. Huggins' bravery under fire and his ability to hold a numerically superior Japanese force at bay, lay the groundwork for an American victory in New Guinea. The place where he fought and was wounded on 3 December 1942 now bears the name "Huggins Road Block," in honor of his valor. With grateful appreciation The American Legion remembers Capt. Meredith Huggins. Erected on behalf of the American Legion by National Commander April[40]
The Japanese also erected a monument commemorating their soldiers' struggle. The war dead from Kochi-ken lies here. 1974, July Governor of Kochi, Kochi-ken, Masumi Mizobuchi, representative of bereaved New Guinea society. Australian units placed a plaque memorializing their fallen comrades. To the memory of the 161 members of the 53, 55, 55/53rd Australian Infantry Battalion (A.I.F) who gave their lives in Papua New Guinea 1942-1945. After the Battle Analysis and View PointsWe [the Japanese] lost at Buna [Gona and Sanananda] because we could not retain air superiority, because we could not supply our troops, and because our navy and air force could not disrupt the enemy supply line. The enemy positions were amazingly well camouflaged, and seemed to have excellent fields of fire even in the close quarters of the jungle … Snipers were everywhere. Most of the men are stricken with dysentery … Starvation is taking many lives, and it is weakening our already extended lines. We are doomed. [All three quotes form part of the War Memorial at Popondetta rededicated 3 November 2002.] Apart from the climate, disease and topography of the northern Papuan lowland the Australian and American troops also had to confront the enemy. The Japanese were trained for jungle warfare, were in the area well before the Allies and were hard fighters making the most of the landform and tactics.
|
This webpage was updated 30th December 2011
Please help me to improve these articles with any addition information
or if you should encounter any broken links or Web page errors :-(
![]()


-01.jpg)